React Router Navigation: Trigger Leave Confirmation Dialog with 5 Easy Steps
Keep Your Users Safe with a Leave Confirmation Dialog for React Router Navigation in Just 5 Simple Steps

Shifair (Faris) is a passionate IT enthusiast who has been in love with the world of technology since a very young age. His interest in the field eventually led him to pursue a career as a software engineer in 2016, where he started working professionally.
As a self-taught programmer, Shifair spent countless hours teaching himself how to code and has since become an expert in various programming languages and frameworks. He has developed several android apps using Android Studio and web projects using React.JS, Next.JS, Node.JS, GraphQL, Gatsby.JS, Strapi.JS, and WordPress.
Throughout his career, Shifair has worked with a variety of companies in the IT industry. He began as a social media analyst at Kampung Creative before moving on to work as an IT consultant at PT Gamatechno. He then worked as a software engineer at Xapiens Teknologi, where he honed his skills and gained valuable experience.
Currently, Shifair is working as a software engineer at Kargo Technologies. Despite his success, he is always seeking new challenges and opportunities to apply his knowledge and continue learning. He is committed to helping his company achieve its targets and is an asset to any team he works with.
Have you ever been confused or wondered how to trigger the leave confirmation dialog if you tried to click another link page with React? But we want to only trigger our custom dialog. Not the alert from our current browser like this one.
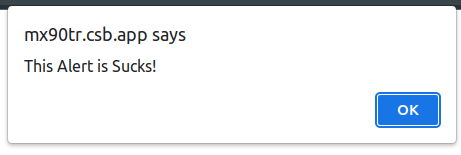
Alert with Plain UI from Default Browser. Suck doesn’t it?
The Demo
Before we, dig through step by step, let me share the result first so you guys can get the overview of what we are going to build
Setup
If you want to create this demo step by step, what you’ll need are these folder structures and packages.
Folder Structure:
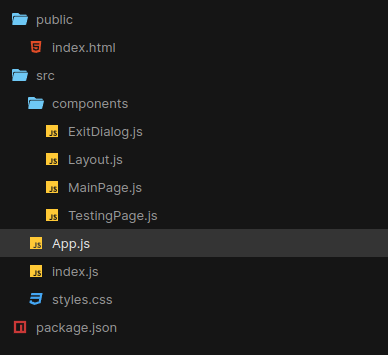
Folder Structure for This Demo
Packages:
“react”: “18.2.0”,
“react-bootstrap”: “2.4.0” -> you can use whatever library that you are most comfortable with. But in this case, we’ll use React Bootstrap,
“react-dom”: “18.2.0”,
“react-router”: “5.3.3”,
“react-router-dom”: “5.3.3”,
“react-scripts”: “4.0.0”

Disclaimer: why we are using React Router version 5? Why not 6? Because most of the large apps are currently using version 5. It has a lot of major changes if those apps upgrade their React Router version into 6. So we only focus on React Router version 5
Step 1 - Initial Project
If you are using CRA for the first time, you can change index.js to be like this to set up with React Router
// index.js
import { StrictMode } from "react";
import { createRoot } from "react-dom/client";
import { BrowserRouter } from "react-router-dom";

import App from "./App";

const rootElement = document.getElementById("root");
const root = createRoot(rootElement);

root.render(
  <StrictMode>
    <BrowserRouter>
      <App />
    </BrowserRouter>
  </StrictMode>
);
Step 2 - Create App.js and Styles
Set up App.js and styles.css (to use Bootstrap library) with this code. Don’t worry about the errors because you haven’t put the related files in your app. You only need three components to make this app run well and we’ll make these files in the next step.
// App.js
import "./styles.css";
import { Switch, Route } from "react-router-dom";
import Layout from "./components/Layout";
import MainPage from "./components/MainPage";
import TestingPage from "./components/TestingPage";

export default function App() {
  return (
    <Switch>
      <Layout>
        <Route exact path="/" component={MainPage} />
        <Route exact path="/testing" component={TestingPage} />
      </Layout>
    </Switch>
  );
}
/* styles.css */
@import url("https://maxcdn.bootstrapcdn.com/bootstrap/latest/css/bootstrap.min.css");

body {
  width: 100%;
  height: 100%;
  box-sizing: border-box;
}
Step 3 - Create the Layout
We will make a navbar to navigate back and forth between Home Page and Testing Page. We will also put children component so the component can be rendered under the Layout component
// Layout.js
import Navbar from "react-bootstrap/Navbar";
import { Link } from "react-router-dom";

const Layout = ({ children }) => {
  return (
    <>
      <Navbar bg="light" expand="lg">
        <Link className="mr-3" to="/">
          Home
        </Link>
        <Link to="/testing">Testing</Link>
      </Navbar>
      {children}
    </>
  );
};

export default Layout;
// MainPage.js
const MainPage = () => {
  return (
    <>
      <div className="d-flex justify-content-center align-items-center">
        <h1>You are currently in main page</h1>
      </div>
    </>
  );
};

export default MainPage;
Step 4 - Create the Trigger Component
Now, this part will be the interesting one. This is where the magic happened.
// TestingPage.js
import { Container, Row } from "react-bootstrap";
import { useCallback, useEffect, useState } from "react";
import { useHistory } from "react-router";
import ExitDialog from "./ExitDialog";

const TestingPage = () => {
  const history = useHistory();
  const [triggerExit, setTriggerExit] = useState({
    onOk: false,
    path: ""
  });
  const [isVisibleDialog, setVisibleDialog] = useState(false);

  const handleGoToIntendedPage = useCallback(
    (location) => history.push(location),
    [history]
  );

  useEffect(() => {
    if (triggerExit.onOk) {
      handleGoToIntendedPage(triggerExit.path);
    }
    const unblock = history.block((location) => {
      if (location.pathname !== "/testing") {
        setVisibleDialog(true);
      }
      setTriggerExit((obj) => ({ ...obj, path: location.pathname }));
      if (triggerExit.onOk) {
        return true;
      }
      return false;
    });

    return () => {
      unblock();
    };
  }, [handleGoToIntendedPage, history, triggerExit.onOk, triggerExit.path]);
  return (
    <>
      <Container>
        <Row className="d-flex justify-content-center align-items-center">
          <h1>
            Testing for Triggering Alert Dialog if you tried to press back
            button on your browser or click another navigation tab
          </h1>
        </Row>
      </Container>
      <ExitDialog
        visible={isVisibleDialog}
        onClose={() => setVisibleDialog(false)}
        onOk={() => {
          setTriggerExit((obj) => ({
            ...obj,
            onOk: true
          }));
          setVisibleDialog(false);
        }}
      />
    </>
  );
};
I will explain these several functions one by one.
const [triggerExit, setTriggerExit] = useState({
    onOk: false,
    path: ""
  });
  const [isVisibleDialog, setVisibleDialog] = useState(false);

  const handleGoToIntendedPage = useCallback(
    (location) => history.push(location),
    [history]
  );
So for the above line codes, we need to make several states and a function.
for lines 1- 4, the state purpose is to trigger the browser with
onOkand to save the intended path namepaththat the user has clicked before it pops the leave confirmation dialog up.for line 5, the state purpose is to show or close the leave confirmation dialog.
for lines 7–9, the function of purpose is to handle the intended page clicked by the user, whether that is back browser history or other pages like from tab navigation.
    useEffect(() => {
    if (triggerExit.onOk) {
      handleGoToIntendedPage(triggerExit.path);
    }
    const unblock = history.block((location) => {
      if (location.pathname !== "/testing") {
        setVisibleDialog(true);
      }
      setTriggerExit((obj) => ({ ...obj, path: location.pathname }));
      if (triggerExit.onOk) {
        return true;
      }
      return false;
    });

    return () => {
      unblock();
    };
  }, [handleGoToIntendedPage, history, triggerExit.onOk, triggerExit.path]);
For the useEffect, I will explain line by line.
For lines 2–4, if the
onOkis true (triggered by ExitDialog.js after clicking the Ok button), the user will navigate to the intended page.For line 5, we will use
history.blockthat came from React Router itself. So what is the purpose of it? Basically, to trigger the alert browser but without popping the default alert dialog. You can read the detail more here.For lines 6–8, if the current pathname is the same
/testingit won’t trigger the alert browser. So the leave confirmation dialog is not visible.For line 8, if the current pathname is not same
/testingit will save the pathname throughtriggerExitstateFor lines 10–13, if the
onOkis true then the browser will trigger the leave confirmation dialog and vice versa.For lines 16–18, the
unblockfunction will be put on unmount cycle so the function won’t render every time.
Step 5 - Synchronize The Dialog and The Trigger
Lastly, put your favourite custom dialog here. I’m using modal by Bootstrap but you can use whatever custom dialog that you have built.
// ExitDialog.js
import React from "react";
import Button from "react-bootstrap/Button";
import Modal from "react-bootstrap/Modal";

const ExitDialog = ({ onClose, onOk, visible = false }) => {
  return (
    <>
      <Modal
        centered
        show={visible}
        onHide={onClose}
        backdrop="static"
        keyboard={false}
      >
        <Modal.Header closeButton>
          <Modal.Title>Warning!</Modal.Title>
        </Modal.Header>
        <Modal.Body>Are you sure you want to move to another page?</Modal.Body>
        <Modal.Footer>
          <Button variant="danger" onClick={onClose}>
            Cancel
          </Button>
          <Button variant="primary" onClick={onOk}>
            Yes, I want to move to another page
          </Button>
        </Modal.Footer>
      </Modal>
    </>
  );
};

export default ExitDialog;
